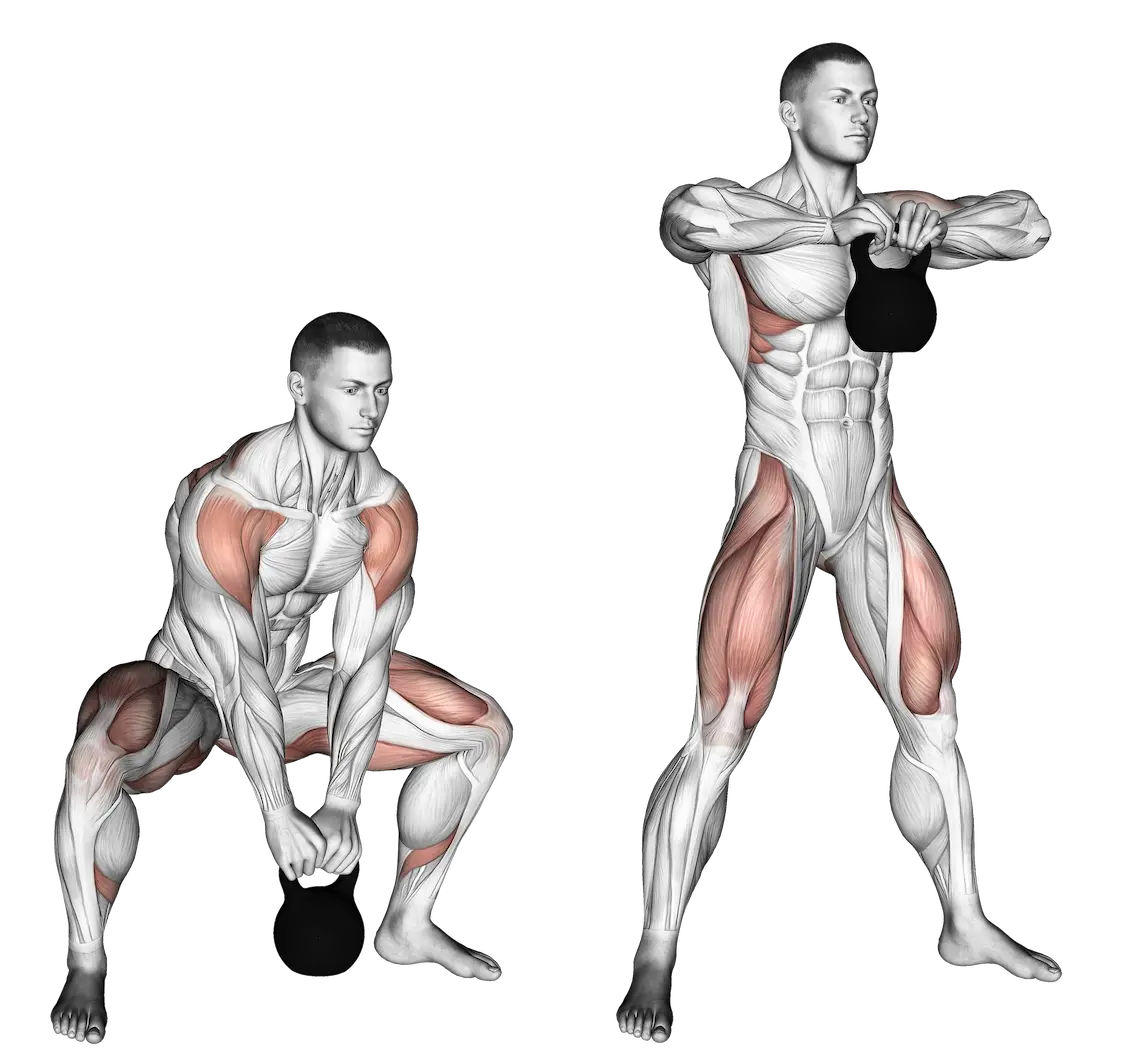
Kettlebell Sumo High Pull
Category: 🟦 Cardio / Plyometrics / HIIT-Tabata
Difficulty: ★★★☆☆
Equipment: 1 kettlebell
The kettlebell Sumo High Pull turns your hip drive into an explosive high pull, without ever turning into a heavy curl.
Purpose
- Develop hip power with vertical force transfer: hip drive → high pull.
- Combine explosiveness, upper-trap/shoulder muscular density, and a high metabolic demand.
- Improve hip-to-arm motor timing in a hybrid squat/hinge pattern using a sumo stance.
Muscles involved
- Primary: glutes, quadriceps, upper/mid trapezius, posterior deltoid.
- Synergists: spinal erectors, hamstrings, adductors, forearms.
- Stabilizers: rib-cage bracing, shoulder girdle control (elevation + rotation), trunk.
- Chains: hip drive → vertical pull — anti-lumbar flexion.
Variations
- Regressions: kettlebell sumo deadlift, partial-range high pull to chest height, lighter kettlebell.
- Variations: double kettlebells, high pull → catch (pre-clean), isometric pause at the top, high pull → squat combo.
- Beginner: choose a load that allows 6–8 controlled explosive reps without pulling with the arms (approx. 16–24 kg for men / 8–12 kg for women).
- Intermediate: 24 kg (M) / 16 kg (F) in clusters of 5–6 reps, with a clear hip drive on every pull.
- Advanced: 28–32 kg in very short cluster sets to preserve speed and timing.
- Key marker: if the movement turns into a dumbbell curl, or the arms start “yanking” the load, the kettlebell is too heavy.
Technique and hip-to-arm timing come before load: every rep must stay explosive and clean.
- Load too heavy: arms pulling on their own, back rounding, impact into the wrists.
- Correct load: dominant hip drive, kettlebell close to the body, smooth path up to the collarbone area.
- Hip priority: generate speed through hip extension; the arms only guide the path.
- Pre-tension: set the grip and rib-cage bracing before the first rep to absorb the dynamic load.
- Scapular stacking: at the top, elbows above wrists, shoulders kept low to load the traps without compressing the neck.
- Short lever arm: keep the path close to the body to reduce leverage stress on the lower back and shoulders.
- Explosive breathing: use power breathing on every hip drive to stabilize the trunk and support power output.
- Range control: stop the pull at collarbone height, never higher, to keep the movement safe and efficient.
- Continuous tension: no long pause at the bottom; use a controlled rebound between reps as long as technique stays clean.
- Start position
- Feet wide in a sumo stance, toes slightly turned out, weight distributed through the whole foot.
- Kettlebell centered between the feet, handle facing you, arms straight but engaged.
- Long spine, rib cage down, neutral gaze, trunk braced.
- Drive phase (hip drive → pull)
- Initiate with an explosive extension of the hips and legs: the kettlebell comes up because you drive through the floor, not because you pull with the biceps.
- As the kettlebell passes above the hips, continue into a vertical pull: elbows rise high, wrists stay under the elbows.
- Keep the path close to the body, without letting the kettlebell swing out in a wide arc.
- Return
- Actively control the descent, keep the elbows controlled, and bring the kettlebell back close to the trunk.
- Return into a sumo hinge: hips move back, knees bend, spine stays long.
- Absorb the load through the hips and lower body, with the heels firmly anchored.
- Rhythm & cues
- Ballistic-style tempo: 1–0–2 (explosive lift — short transition — controlled descent).
- Simple cues: “Hips first”, “Arms follow”, “Elbows high, shoulders low”, “Hip drive, not a curl”.
- Stop the set as soon as the hip drive slows down or the arms take over.
| ❌ Common faults | ✅ Best practices |
|---|---|
|
|
| Phase 3 – HIIT (Cardio Peak 1)Integration of the Sumo High Pull within the 1% Method | |
|---|---|
| Purpose | Create an explosive cardio peak while developing hip drive and hip-to-pull timing for transfer to the clean and snatch. |
| Placement | Used in Phase 3 – HIIT (Cardio Peak 1), at the core of the metabolic cardio block. With a lighter load, it can be used as a drill at the end of Phase 2 – Neuro-Activation before a clean or a swing. |
| Structure | Short 6–10-minute blocks: Tabata 20/10, EMOM, or explosive clusters, placed between two grind blocks (push/pull) and an anti-extension core block. |
| Load / RPE | RPE 6–8: speed and quality stay high, with no failure. As soon as the movement turns into a curl or the back takes over, stop the set. |
| Frequency | 1–2×/week maximum, alternating with other ballistic movements (swings, cleans) to limit trap and lower-back fatigue. |
| 1% integration | Pair the Sumo High Pull with a pushing movement (press or push-up) and a core block (anti-extension / anti-rotation) to respect the push/pull logic and protect the spine. |
| Key instruction | “If it turns into a curl or your back is taking the hit, the exercise leaves the block”: reduce the load or end the set, but never negotiate with technique. |
| Format | Work | Rest | Rounds | |
|---|---|---|---|---|
| Tabata Sumo High Pull | 20/10 intervals | 20 s | 10 s | Up to 8 (max) |
| Explosive clusters | Short hip-drive sets | 6 reps | 15 s | 8–10 |
| EMOM | Every Minute On the Minute | 10 reps | Remainder of the minute | 8–10 min |
Phase 3 – HIIT
(Cardio Peak 1)
Integration logic
- Phase 3 – HIIT (Cardio Peak 1): the main cardio peak of the session, placed between a grind block (push/pull) and a core block.
- Can be used as a light technical drill at the end of Phase 2 – Neuro-Activation before a clean or a swing, or as an accessory in Phase 4 – Muscle Workout after a heavier horizontal pull.
Recommended frequency
- 1–2×/week maximum in a ballistic block, alternating with other HIIT formats to avoid overloading the traps and lower back.
- Avoid placing it after heavy deadlift or rowing work if lower-back fatigue is already high.
Explosive + metabolic, never at the expense of timing. Stop the set as soon as speed or quality clearly drops.
The Sumo High Pull remains a hip-drive exercise, not a heavy shoulder/biceps pull. If you see the elbows move before the hips, the purpose is lost: stop the set, breathe, correct the sequence, then resume.
It is better to go too light and stay explosive than to go heavy and slow. Clean speed and repeated high-quality reps will create more transfer to your cleans/snatches than sets forced through willpower.
As soon as the line breaks or the lower back becomes the accelerator, stop — the spine never pays the price for speed.