Stationary Bike – Spin Bike
Category: 🔵 Cardio – HIIT / Tabata / Active Recovery
Difficulty: ★★☆☆☆ to ★★★☆☆ (beginner to strong intermediate)
Equipment: Stationary bike (RPM-style or spin bike)
Goal
- Improve cardio-respiratory capacity with minimal joint impact.
- Strengthen the lower body and challenge the core and upper body in stabilisation through a smooth, circular pedal stroke.
- Offer a joint-friendly alternative to the treadmill for sensitive knees, hips, and lower back.
- Act as a central tool for HIIT and Tabata blocks in the 1% Method (highly precise intensity, 100% indoor).
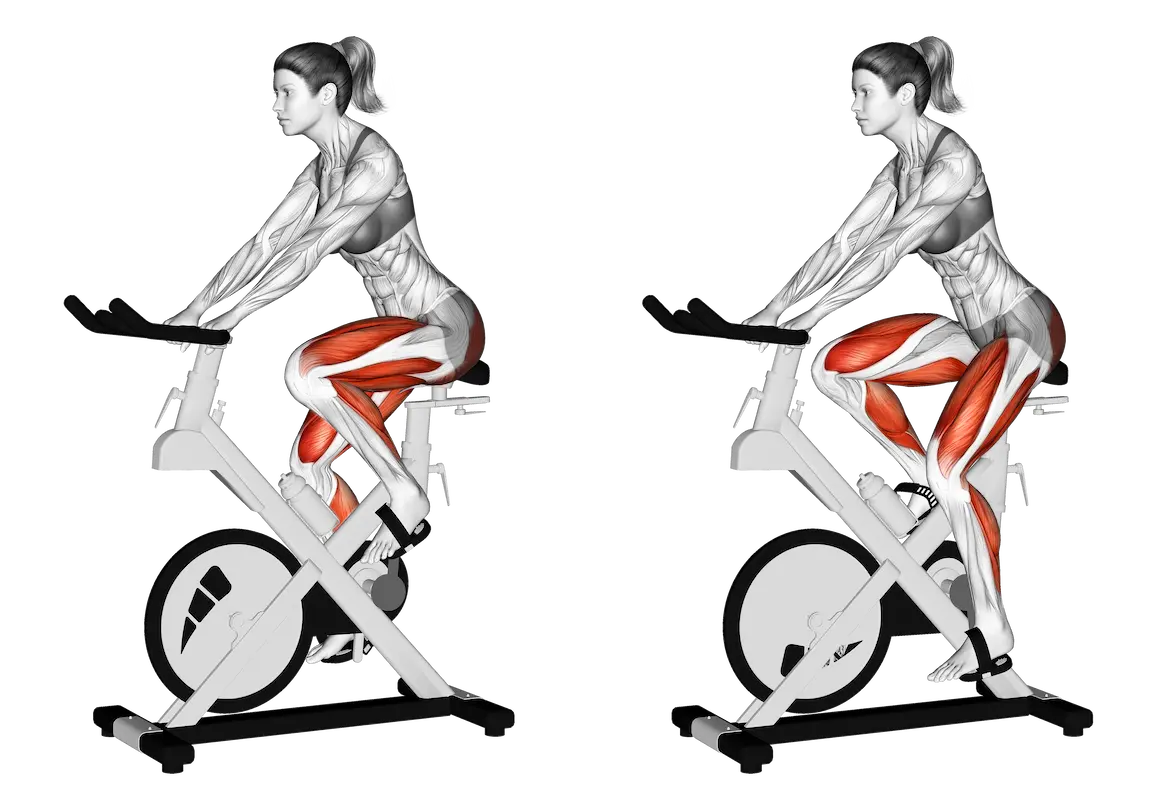
Muscles worked
- Primary: quadriceps, hamstrings, calves.
- Glutes: gluteus maximus and medius (especially in standing position / higher resistance).
- Core: abdominals and lower back in postural bracing, especially out of the saddle.
- Upper body: shoulders, arms, and scapular stabilisers during sprints or standing work.
Variations
- Seated sprints: explosive work focused on the quadriceps.
- Standing sprints: more emphasis on the glutes and hamstrings, similar feel to hill work.
- Single-leg pedalling (30 s per leg): improves symmetry, coordination, and pedal stroke quality.
- Progressive resistance: pyramid formats are ideal for HIIT blocks (controlled load increase).
The stationary bike is the reference tool to push very hard in HIIT or Tabata while keeping joint risk to a minimum.
Technique — Step by step
Starting position
Start by adjusting saddle height: the top of the saddle should roughly line up with your hip bone when you stand next to the bike. In the saddle, keep a slight knee bend at the bottom of the pedal stroke. The handlebar is level with the saddle or slightly higher. Chest open, elbows soft, core braced, eyes looking ahead.
Getting started
Begin with light to moderate resistance. Aim for a round pedal stroke: push down and then lightly pull up, without jerks. Seated, keep the pelvis stable. Standing (RPM / sprint format), spread the weight across the whole foot, torso slightly inclined, hands firm but not tense on the handlebar.
Intensity management
- Neuro block (pre-HIIT): 5 min at 50–60% effort, cadence 80–90 RPM, light to moderate resistance. Feel: easy breathing, legs warming up.
- Tabata block: 8 × (20 s work / 10 s rest) at 90–100% effort. High but manageable resistance, cadence 90–110 RPM during the 20 s, very light load in the 10 s, legs always turning.
- Active recovery: 3–6 min at 40–50% effort, very light resistance. Goal: let heart rate come down progressively, no impact.
Breathing / Posture
Maintain light core bracing throughout the movement. Avoid collapsing onto the handlebar or locking the arms. Breathing: let exhalation follow the push phase, inhalation on the return. The higher the intensity, the more you focus on pelvic stability.
End of block
At the end of HIIT or Tabata, lower the resistance first, then reduce cadence. Stay 1 to 3 minutes with very light pedalling before getting off the bike. Don’t jump straight to the floor: give your heart rate and blood pressure time to return to normal.
| ❌ Common mistakes | ✅ Best practices |
|---|---|
|
|
Standard formats
| Neuro Block (pre-HIIT) | Tabata Block (Explosive) | Active Recovery Block (Cool down) | |
|---|---|---|---|
| Duration | 5 min | 4 min (8 × 20/10) | 3–6 min |
| Intensity | 50–60% effort | 90–100% effort | 40–50% effort |
| Main goal | Neural activation and muscular warm-up | Metabolic peak, maximal anaerobic power | Progressive cool down with no impact |
| Feel | Easy breathing, legs waking up | Quads on fire, very short breath at the end | Heart rate coming down, tension decreasing |
1% Method
⚠️ Do not stack a long HIIT and a full Tabata on the same bike in a single session.
Phase 2 – Neuro-connection: 5 min around 50–60% HRmax
- Level 1: seated pedalling, light resistance, smooth cadence, easy breathing.
- Level 2: moderate resistance, cadence 80–90 RPM, clear work sensation but no major burn.
- Level 3: slight resistance increase, occasional standing work, gradual rise to ~60% effort.
Goal: wake up the lower body and the nervous system without eating into the main HIIT or Tabata block.
Cardio Peak 1 & 2: Controlled HIIT + Final Tabata
HIIT (Phase 3 – Cardio Peak 1)
- Format: 6 to 10 × (30 s work / 30 s recovery) or 8 × (40/20), depending on level.
- Effort: 70–85% effort, RPE 7–8/10, dynamic cadence with clean technique.
- Posture: seated or standing depending on resistance, but always with stable pelvis, braced core, relaxed shoulders.
- Active rest: lower resistance, slow to moderate cadence, never a full stop between reps.
Goal: create a controlled cardio peak without sacrificing technique or trunk stability.
Tabata (Phase 6 – Cardio Peak 2)
- Format: 8 × (20 s work / 10 s rest) on a single exercise (stationary bike).
- Effort: 90–100% effort, RPE 9–10/10, cadence maintained on every 20-second bout.
- Resistance: high, but compatible with a smooth pedal stroke (no blocking or jerks).
- Recovery: 10 s of very light active pedalling, then 3–6 min of cool down once the full block is complete.
Coach’s Note
A good setup changes everything:
👉 better power
👉 less tension
👉 smoother cadence
👉 and above all no knee / hip / lower-back pain.
Here’s a simple, universal method you can teach to every client.
Saddle height (the absolute base)
The leg should be almost straight but never locked at the bottom of the stroke.
Practical method:
- Stand next to the bike.
- Raise the saddle to roughly hip-bone (iliac crest) height.
- Sit on the saddle → place your heel on the pedal → push the pedal down.
- If the leg is straight without hyperextension, the height is correct.
- Put the forefoot back on the pedal: you get a comfortable slight knee bend.
👉 Typical error: saddle too low = knee overload.
👉 Fix: go one notch higher if you feel abnormal burning around the kneecap.
Saddle fore–aft (horizontal adjustment)
Goal: a stable centre of gravity and protected knees.
Quick method:
- Set the cranks horizontal, front foot at the forward point.
- Look at the knee: the kneecap should be above the pedal axle, not ahead of it.
- If the knee goes past the axle → move the saddle backward.
- If you feel like you’re “pushing behind you” → move the saddle one notch forward.
👉 Desired feel: you can push hard without feeling the quadriceps “jamming” the joint.
Handlebar height
Unlike a road bike, here the priority is comfort and breathing, not aerodynamics.
Recommended setup:
- Handlebar level with the saddle or slightly higher.
- Higher if:
✓ sensitive lower back
✓ neck pain
✓ beginners
👉 Too low = torso collapses = neck and upper traps take the hit.
👉 The right setup = you can breathe with full amplitude while keeping the core engaged.
Saddle–bar distance (reach)
Test with your hands on the handlebar:
- Elbows soft.
- Shoulders down.
- Torso neither too far nor cramped.
Reliable indicator:
If you have to round your back to reach the bars, bring them closer.
If your arms are too straight to stay relaxed, move the bar slightly away.
Pedal strap tightness
A strap that’s too loose = power loss + slipping risk.
Coach tip:
- Adjust so the forefoot stays centred and the “upstroke” feels smooth.
- Too tight = discomfort.
- Too loose = poor efficiency.
Summary:
- Saddle height: leg almost straight, never locked.
- Saddle fore–aft: knee aligned with the pedal axle.
- Handlebar: height = comfort + free breathing.
- Reach: relaxed arms, neutral spine.
- Straps: snug enough to stabilise the foot.
Used correctly, the spin bike becomes your smart cardio lab: HIIT, Tabata, and active recovery — all without pounding the joints.